the best Baked Italian Sub Sandwich: Comfort in Every Bite
Heavenly Layers of Flavor
I first whipped up the best Baked Italian Sub Sandwich on a chilly evening when I craved something hearty and comforting. The moment I pulled it from the oven, the aroma of melted cheese and seasoned meats filled my kitchen, creating an inviting atmosphere that made it impossible to resist. Each bite was a delightful explosion of textures and flavors, with crispy bread cradling a warm, savory filling that was so easy to make.
What truly sets this sandwich apart is the way it brings people together; whether it’s a cozy family dinner or a casual date night, everyone can’t help but smile at the sight of this cheesy goodness. The intoxicating smell wafting through your home will have loved ones gathering around the table, eagerly anticipating their first taste. It’s the kind of dish that transforms an ordinary weekday into something special.
To elevate your experience, serve this baked delight with a side of crispy potato chips or a fresh garden salad drizzled with tangy vinaigrette. You can also spice things up with your favorite toppings like banana peppers or fresh basil. Trust me, once you take that first bite, you’ll be counting down the days until you can make the best Baked Italian Sub Sandwich again!
What are The Best Baked Italian Sub Sandwich?
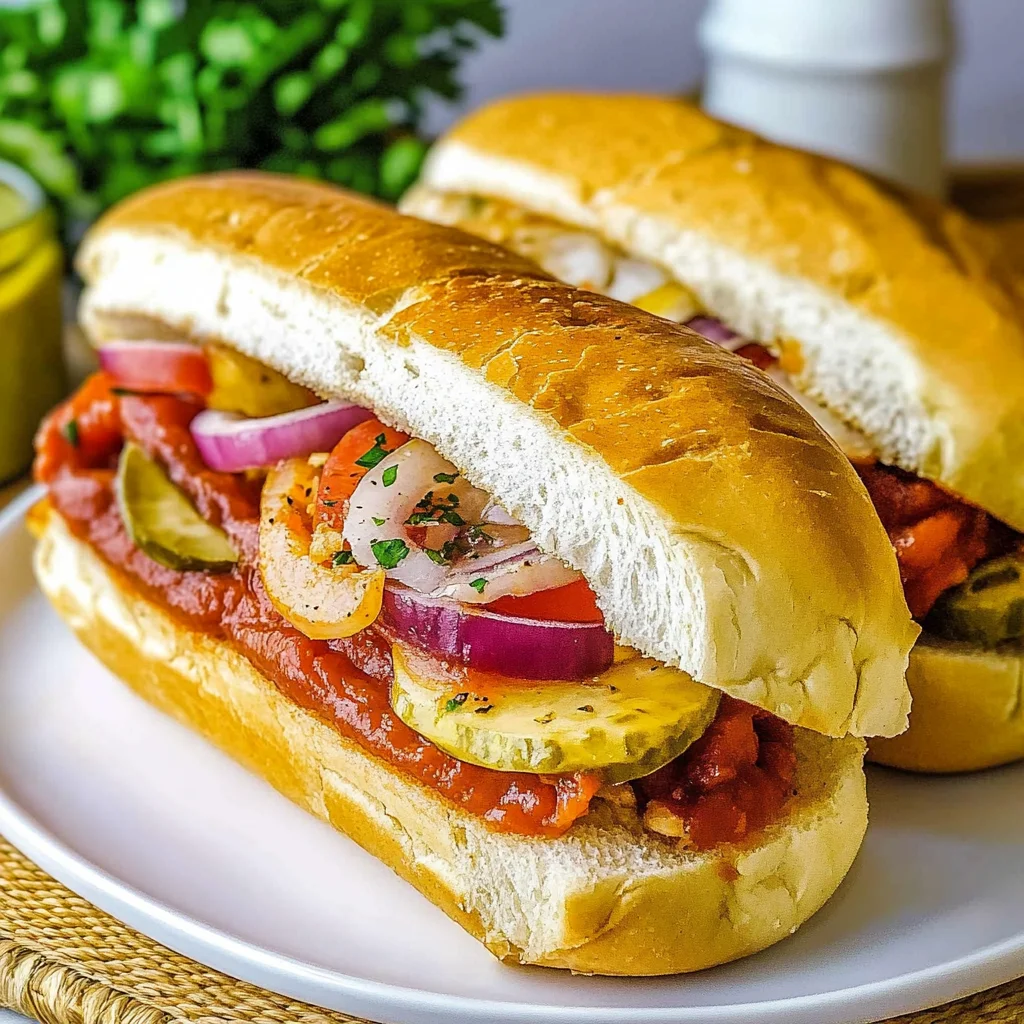
The Best Baked Italian Sub Sandwich is a delightful fusion of flavors, combining traditional Italian deli meats like salami, ham, and pepperoni layered between soft, toasted Italian sub rolls. Topped with melty provolone cheese and fresh veggies such as shredded lettuce, sliced tomatoes, and zesty banana peppers, this sandwich offers a crispy exterior with a tender and juicy filling that is simply irresistible. Baked to perfection in the oven, it allows the ingredients to meld together beautifully while creating a golden crust that enhances the overall taste. Plus, this dish is incredibly easy to prepare with minimal cleanup required, making it a perfect option for gatherings or a cozy night in.
Perfect For:
Weeknight Dinners: This recipe comes together quickly and easily, making it perfect for those busy evenings when you want a hearty meal without the fuss.
Feeding a Crowd: With its generous portions and delicious flavors, The Best Baked Italian Sub Sandwich is great for gatherings—everyone will love digging into their own cheesy, meaty sandwich!
Comfort Food Cravings: On a chilly night or when you’re feeling under the weather, this warm, melty sub will wrap you in comfort and satisfaction with every bite.
Game Day Treats: Elevate your game day spread with this tasty sandwich that’s sure to be a hit; it’s easy to slice into sections for sharing while cheering on your favorite team!
the best Baked Italian Sub Sandwich Ingredients
For the Bread and Base
- 4 rolls Italian sub rolls (or hoagie rolls) – Choose fresh rolls for a crispy exterior and soft interior that will hold all the delicious fillings.
For the Meats
- 4 oz sliced salami – Adds a rich, savory flavor that perfectly complements the other meats.
- 4 oz sliced ham – Provides a mild sweetness to balance the spiciness of the salami and pepperoni.
- 4 oz sliced pepperoni – Brings a zesty kick, making this sandwich truly irresistible and full of flavor.
For the Cheese
- 8 oz provolone cheese (sliced) – Melts beautifully, creating a gooey layer that binds everything together for the best Baked Italian Sub Sandwich experience.
For the Vegetables
- 1 cup shredded lettuce – Offers a fresh crunch that contrasts with the savory meats and cheese.
- 1 medium tomato (sliced) – Adds juiciness and acidity to brighten up each bite.
- 1/4 cup banana peppers (sliced) – Introduces a tangy heat that elevates this sub to new heights.
For the Condiments
- 2 tbsp olive oil – Drizzled for added richness and helps meld the flavors of your subs together.
- 1 tbsp Italian seasoning – Infuses fragrant herbs into your sandwich, enhancing its overall taste profile.
- 1 tbsp red wine vinegar – Adds a splash of acidity that cuts through the richness of the meats and cheese.
- 1 tbsp mustard (optional) – Provides an extra layer of flavor; feel free to adjust based on your taste preferences!
Kitchen Equipment You’ll Need

- Oven
- Baking sheet
- Aluminum foil
- Sharp knife
- Cutting board
- Small mixing bowl
Step-by-Step Instructions
Step 1:
Preheat the oven to 350°F (175°C). This is an important first step to ensure that your sandwiches bake evenly and come out perfectly melty and warm.
Step 2:
Slice the Italian sub rolls in half lengthwise. Make sure to cut them gently to keep the rolls intact, which will help hold all those delicious fillings together later.
Step 3:
Layer the salami, ham, and pepperoni evenly on the bottom half of each roll. Aim for a nice distribution of meats so every bite is packed with flavor. You want to see a colorful array of meats peeking out!
Step 4:
Add the provolone cheese on top of the meats. This cheese is going to melt beautifully during baking, creating a wonderful gooey texture that complements the meats perfectly.
Step 5:
Top with shredded lettuce, tomato slices, and banana peppers. These fresh toppings add crunch and a burst of flavor, making your sandwich not just hearty but also refreshing.
Step 6:
In a small bowl, mix together the olive oil, Italian seasoning, and red wine vinegar. This flavorful mixture will enhance your sandwich with zesty notes—it’s worth taking a moment to combine these ingredients well.
Step 7:
Drizzle the mixture over the toppings on each sandwich. Be generous but controlled; you want to add moisture without making things soggy. The goal is a perfect balance that brings everything together.
Step 8:
Spread mustard on the top half of the rolls if desired. If you love that tangy kick, this step is optional but highly recommended for an extra layer of flavor!
Step 9:
Place the assembled sandwiches on a baking sheet and cover with aluminum foil. This will help keep them warm while they bake and prevent them from drying out initially.
Step 10:
Bake in the preheated oven for 15 minutes. During this time, your kitchen will fill with mouthwatering aromas as everything heats up and melds together beautifully.
Step 11:
Remove the foil and bake for an additional 5 minutes, or until the cheese is melted and bubbly. Keep an eye on them; you want that cheese to be golden brown and oozing!
Step 12:
Remove from the oven, let cool slightly, then slice and serve warm. These sandwiches are best enjoyed fresh out of the oven while they’re still gooey—perfect for sharing at any gathering!
Tips
- Choose the right rolls: Using fresh Italian sub rolls or hoagie rolls ensures a sturdy base that can hold all the delicious fillings without falling apart. Stale bread can lead to a soggy sandwich that lacks texture.
- Layer wisely: When stacking the meats, start with salami, then ham, and finish with pepperoni. This layering not only creates a great flavor profile but also helps distribute moisture evenly, preventing one ingredient from overpowering the others.
- Don’t skip the foil: Covering your sandwiches with aluminum foil while baking retains moisture and helps melt the cheese evenly. This step is crucial for achieving that gooey, melty texture that makes a baked sub irresistible.
- Watch your baking time: Keep an eye on your sandwiches during the last few minutes of baking. Removing the foil too late could lead to overcooked bread, while taking it off too early might result in under-melted cheese.
- Add condiments just before serving: To maintain crunch in your lettuce and freshness in your tomatoes, add condiments right before serving. This way, you avoid wilting your vegetables and ensure every bite is crisp and flavorful.
- Let them cool a bit before slicing: Allowing your sandwiches to cool slightly after baking makes slicing easier and helps prevent all the fillings from spilling out. It also allows flavors to meld together beautifully.
Optional Ingredients
- Mozzarella cheese: Adding a layer of fresh mozzarella will enhance the creaminess and stretchiness of your sub, creating an irresistible melty texture. Simply layer slices on top of the provolone before baking.
- Jalapeños: For those who crave a spicy kick, sliced jalapeños provide a vibrant heat that balances the richness of the meats. Add them between the layers of meat for an added punch.
- Roasted red peppers: These sweet and smoky peppers bring a burst of flavor and color to your sandwich. Layer them on top of the lettuce or mix them into the meat for a delightful contrast.
- Lemon juice: A splash of fresh lemon juice brightens up all the flavors in your sub with its zesty acidity, making each bite more refreshing. Drizzle it over the fillings before baking.
- Balsamic glaze: Drizzling balsamic glaze on top after baking adds a sweet and tangy finish that complements the savory ingredients beautifully. Use it sparingly to avoid overpowering the sandwich.
- Fresh basil leaves: A few sprigs of fresh basil add a fragrant herbal note that elevates the overall taste profile of your baked sub. Tear and sprinkle them on just before serving for maximum freshness.
What to Pair with The Best Baked Italian Sub Sandwich?
To complement the hearty flavors of The Best Baked Italian Sub Sandwich, consider starting your meal with a fresh salad. A classic Caesar salad or a simple arugula salad with a tangy lemon vinaigrette works beautifully here. The crisp greens and zesty dressing provide a refreshing contrast to the rich, savory elements of the sandwich, balancing each bite with bright acidity and crunch.
For a comforting side, roasted garlic mashed potatoes can elevate your meal experience. Their creamy texture and subtle garlic flavor harmonize perfectly with the robust meats and melted provolone in the sandwich. This combination creates a satisfying blend of textures that enhances the overall indulgence of your dining experience.
A delightful drink pairing is a chilled Pinot Grigio or a light-bodied red like Chianti. These wines offer crisp acidity that cuts through the richness of the cheese and meats, refreshing your palate for another bite. Alternatively, for a non-alcoholic option, consider sparkling water with a splash of lemon—its effervescence complements the sandwich’s savory profile while keeping things light and lively.
Variations and Substitutions
Whole Wheat Rolls Instead: Swap out the Italian sub rolls for whole wheat rolls to add a nutty flavor and extra fiber. This change not only makes your sandwich a bit heartier but also offers a healthier twist without sacrificing taste.
Turkey and Avocado: Replace the salami, ham, and pepperoni with sliced turkey breast and creamy avocado for a lighter, yet still satisfying option. The turkey adds lean protein while the avocado contributes rich creaminess, making for a deliciously fresh take on the classic sub.
Cheddar Cheese Upgrade: Substitute provolone cheese with sharp cheddar for a bolder flavor profile. The tangy notes of cheddar will enhance the savory meats and provide an inviting contrast that elevates the overall taste of your sandwich.
Roasted Red Peppers: Instead of banana peppers, try adding roasted red peppers for a smoky sweetness. They not only add vibrant color but also bring a depth of flavor that pairs beautifully with the meats and condiments.
Cauliflower Flatbreads: For a low-carb alternative, use cauliflower flatbreads instead of traditional rolls. This swap allows you to enjoy all the flavors of the baked Italian sub while keeping it light and suitable for keto or gluten-free diets.
Spicy Italian Sausage: Switch out the pepperoni for spicy Italian sausage to crank up the heat in your sandwich. The sausage will infuse each bite with bold flavors and juicy texture, making it perfect for those who love a little kick.
Herbed Cream Cheese Spread: Add a layer of herbed cream cheese on the top half of the roll instead of mustard for a creamy twist. This variation introduces an herbaceous richness that complements the other ingredients wonderfully, making each bite decadent.
To store your Best Baked Italian Sub Sandwich in the refrigerator, allow it to cool to room temperature before wrapping it tightly in aluminum foil or placing it in an airtight container. This dish will keep well for up to 3 days. When you’re ready to enjoy it again, simply reheat in the oven at 350°F (175°C) for about 10-15 minutes, which helps restore its crispy texture and melty cheese.
This sandwich does not freeze exceptionally well due to the bread’s tendency to become soggy when thawed. However, if you prefer to freeze it, wrap individual sandwiches tightly in plastic wrap and then place them in a freezer-safe bag or container. They can be stored for up to 2 months; when ready to eat, thaw overnight in the refrigerator and reheat in the oven as mentioned above for best results.
FAQ
Can I use a different type of bread for this recipe?
Yes, you can substitute the Italian sub rolls with other types of bread such as ciabatta or hoagie rolls. Just ensure that the bread can hold up to the fillings and baking process without becoming too soggy.
What if I don’t have provolone cheese?
If provolone cheese isn’t available, mozzarella or even cheddar can work as substitutes. While it may alter the flavor slightly, these cheeses will still melt beautifully and complement the meats well.
Can I prepare these sandwiches in advance?
Absolutely! You can assemble the sandwiches a few hours ahead of time and store them in the refrigerator until you’re ready to bake. Just cover them tightly with aluminum foil or plastic wrap to keep them fresh.
How do I keep the meats from getting dry?
To prevent dryness, make sure not to overbake the sandwiches. Keep an eye on them in the oven, especially during the last few minutes, so they remain juicy and flavorful.
Is there a way to make this recipe gluten-free?
Yes, you can easily make this recipe gluten-free by using gluten-free sub rolls. Be sure to check all other ingredients for any hidden gluten, particularly in condiments like mustard and vinegar.
Can I add more vegetables to the sandwich?
Definitely! Feel free to customize your sandwich by adding other veggies such as sliced onions, bell peppers, or olives. Just be mindful of the moisture content to avoid sogginess.
How spicy is this recipe with banana peppers?
The banana peppers add a mild tangy spice that enhances the flavor without overwhelming heat. If you’d like more spice, consider adding sliced jalapeños or a spicier pepper variety according to your taste preference.
Can I use frozen deli meats for this sandwich?
While fresh deli meats are recommended for optimal flavor and texture, you can use thawed frozen deli meats. Just ensure they are fully defrosted before assembling your sandwich for even cooking and melting.
The Best Baked Italian Sub Sandwich
Ingredients
Method
- Preheat the oven to 350°F (175°C).
- Slice the Italian sub rolls in half lengthwise.
- Layer the salami, ham, and pepperoni evenly on the bottom half of each roll.
- Add the provolone cheese on top of the meats.
- Top with shredded lettuce, tomato slices, and banana peppers.
- In a small bowl, mix together the olive oil, Italian seasoning, and red wine vinegar.
- Drizzle the mixture over the toppings on each sandwich.
- Spread mustard on the top half of the rolls if desired.
- Place the assembled sandwiches on a baking sheet and cover with aluminum foil.
- Bake in the preheated oven for 15 minutes.
- Remove the foil and bake for an additional 5 minutes, or until the cheese is melted and bubbly.
- Remove from the oven, let cool slightly, then slice and serve warm.