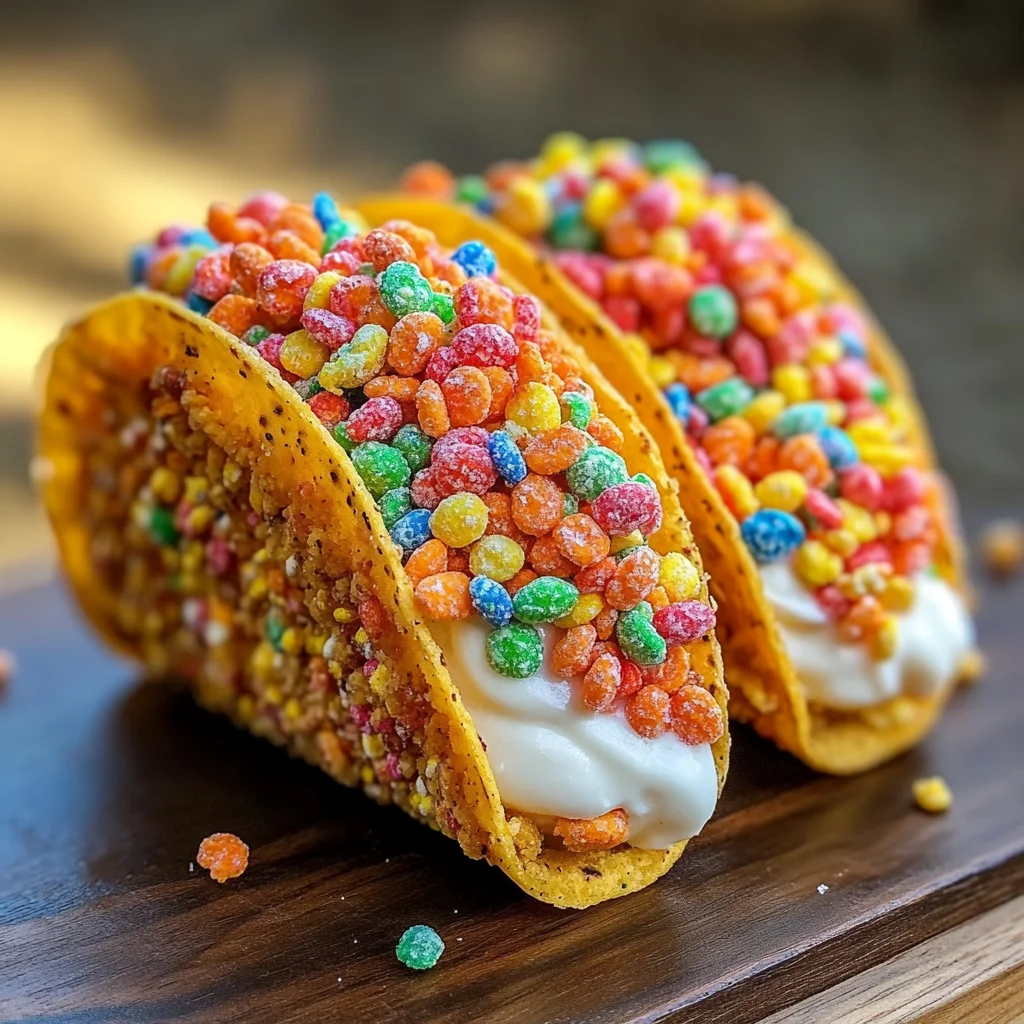
Fruity Pebbles Cheesecake Tacos
If you’re looking for a dessert that brings a smile to everyone’s face, then you’ve come to the right place! Fruity Pebbles Cheesecake Tacos are not just a treat; they’re a delightful experience. Imagine crunchy, colorful cereal shells filled with creamy cheesecake goodness—what’s not to love? This recipe is perfect for any occasion, whether you’re celebrating a birthday, hosting a family gathering, or simply wanting to brighten up a busy weeknight.
What makes these tacos extra special is their vibrant colors and playful presentation. They’re sure to be a hit with kids and adults alike, inspiring joy and laughter around the table. Trust me; once you take that first bite of fruity goodness, you’ll see why this recipe has become one of my favorites!
Why You’ll Love This Recipe
- Easy to Make: With only a few simple steps, you can whip up these fun desserts in no time!
- Family-Friendly Fun: Kids will love helping out in the kitchen, making it a wonderful bonding activity.
- Make Ahead Convenience: These tacos can be prepared in advance, giving you more time to enjoy your company.
- Deliciously Colorful: Their vibrant appearance makes them perfect for parties and celebrations!
- Customizable Treats: You can easily add your favorite toppings to make each taco unique.

Ingredients You’ll Need
Let’s gather some simple, wholesome ingredients that come together beautifully! Each component is easy to find and adds to the delightful flavor of these Fruity Pebbles Cheesecake Tacos.
For the Taco Shells:
- 3 cups fruity cereal
- 1/2 cup unsalted butter, melted
For the Cheesecake Filling:
- 8 oz cream cheese, softened to room temperature
- 1/2 cup powdered sugar, sifted
- 1 tsp pure vanilla extract
- 1 cup whipped cream
For Toppings:
- Additional fruity cereal
Variations
One of the best parts about this recipe is how flexible it is! Feel free to get creative with different flavors and toppings. Here are some fun ideas:
- Add Some Color: Mix in colorful sprinkles into the cheesecake filling for an extra festive touch.
- Switch Up the Cereal: Try using different cereals for unique flavors and textures—chocolate or marshmallow varieties could be delicious!
- Fruit Toppings: Add fresh fruit like strawberries or bananas on top for a refreshing twist.
- Nutty Crunch: Sprinkle chopped nuts on top for added crunch and flavor contrast.
How to Make Fruity Pebbles Cheesecake Tacos
Step 1: Prepare the Cereal Shells
Start by combining your fruity cereal with melted butter in a mixing bowl. Stir well until each piece is evenly coated. This step is crucial because it helps create that perfect crunchy shell that holds all the delicious cheesecake filling!
Step 2: Shape the Taco Shells
Next, press the cereal mixture firmly into small taco-shaped molds or muffin tins. Make sure to compact it tightly so that it holds its shape when you remove them later. Chill these in the refrigerator for at least 30 minutes—this will help them set perfectly!
Step 3: Make the Cheesecake Filling
While your shells are chilling, let’s whip up that creamy filling! Using a hand mixer, beat your softened cream cheese until it’s light and fluffy. Gradually add in the powdered sugar and vanilla extract, blending until smooth. This step ensures every bite of your cheesecake filling is rich and flavorful.
Step 4: Fold in Whipped Cream
Gently fold whipped cream into your cream cheese mixture using a spatula. Be careful not to overmix; we want to keep that light texture! This step adds airiness and makes your filling incredibly luscious.
Step 5: Fill Your Taco Shells
Once your cereal shells are firm enough, it’s time for the fun part—spooning that creamy cheesecake filling into each shell generously! Don’t be shy; fill them up nicely so every bite is packed with flavor.
Step 6: Add Final Touches
Finally, sprinkle additional fruity cereal over your filled shells for an extra pop of color and crunch. Serve immediately or chill them again if you prefer a firmer texture. Enjoy these delightful Fruity Pebbles Cheesecake Tacos with friends and family—they’re sure to bring smiles all around!
Pro Tips for Making Fruity Pebbles Cheesecake Tacos
Making these Fruity Pebbles Cheesecake Tacos is all about having fun in the kitchen and creating a playful dessert that everyone will love! Here are some helpful tips to ensure your tacos turn out perfectly.
-
Use fresh ingredients: Fresh cream cheese and whipped cream will enhance the flavor of your cheesecake filling, making it richer and more delicious.
-
Compact the cereal mixture: Pressing the cereal mixture firmly into your molds is crucial for creating sturdy taco shells that won’t fall apart when filled.
-
Chill before filling: Allowing the cereal shells to chill for at least 30 minutes helps them set properly, giving you a perfect base for your creamy filling.
-
Fold gently: When mixing the whipped cream into the cheesecake mixture, fold gently to maintain that light and airy texture. This will make each bite feel indulgently fluffy!
-
Get creative with toppings: Feel free to add colorful fruits like strawberries or blueberries on top of your tacos, or drizzle with chocolate sauce for an extra touch of sweetness!
How to Serve Fruity Pebbles Cheesecake Tacos
Presenting your Fruity Pebbles Cheesecake Tacos can be just as fun as making them! Here are some delightful ways to serve this vibrant dessert.
Garnishes
- Whipped cream dollops: Add a few dollops of whipped cream on top of each taco for an extra creamy touch that contrasts nicely with the crunchy shell.
- Colorful sprinkles: A sprinkle of bright, colorful sprinkles can enhance the fun presentation and make these tacos even more festive!
- Fresh fruit slices: Slices of strawberries or kiwi not only add a pop of color but also provide a refreshing balance to the sweetness.
Side Dishes
- Fruit salad: A light and refreshing fruit salad can cleanse the palate between bites of rich cheesecake, offering a healthy balance to your dessert spread.
- Vanilla ice cream: Creamy vanilla ice cream is a classic pairing that complements the fruity flavors in your tacos beautifully, making every bite a treat!
- Chocolate-covered strawberries: These delightful treats bring an elegant touch to your dessert table while also being easy to grab between taco bites.
- Mini cupcakes: Offering mini cupcakes alongside your tacos allows guests to have another sweet option while maintaining the playful vibe of your dessert selection.
With these tips and serving suggestions, your Fruity Pebbles Cheesecake Tacos will not only taste amazing but look stunning too! Enjoy creating this vibrant dessert that’s sure to bring smiles all around.
Make Ahead and Storage
These Fruity Pebbles Cheesecake Tacos are not only delightful to make but also perfect for meal prep! You can easily whip them up in advance for parties, celebrations, or just a sweet treat throughout the week.
Storing Leftovers
- Store any leftover cheesecake filling and cereal shells separately in airtight containers in the refrigerator.
- Consume within 2-3 days for the best texture and flavor.
Freezing
- To freeze, place the filled taco shells on a baking sheet and freeze until solid.
- Once frozen, transfer them to a freezer-safe bag or container. They can be stored for up to 1 month.
Reheating
- If you prefer your tacos slightly warm, let them sit at room temperature for about 10 minutes before serving.
- For a quick heat-up, microwave each taco for about 10-15 seconds; avoid overheating to prevent sogginess.
FAQs
Here are some common questions you might have about making these scrumptious treats!
Can I use different cereals for Fruity Pebbles Cheesecake Tacos?
Absolutely! While Fruity Pebbles add vibrant color and flavor, you can experiment with other colorful cereals or even granola. Just keep in mind that the texture may vary.
How long do Fruity Pebbles Cheesecake Tacos last?
When properly stored, these delightful tacos will last about 2-3 days in the refrigerator. For longer storage, consider freezing them as mentioned above!
Can I make the cheesecake filling ahead of time?
Yes! You can prepare the cheesecake filling a day ahead of time. Just store it in an airtight container in the refrigerator until you’re ready to fill your taco shells.
Do I need to chill my Fruity Pebbles Cheesecake Tacos before serving?
While chilling is optional, I recommend letting them chill for at least 30 minutes. This helps set the filling and makes for a delightful bite!
Final Thoughts
I hope you’re as excited as I am about these fun and fruity desserts! The combination of crunchy cereal with creamy cheesecake is sure to bring smiles all around. Enjoy making these colorful treats—whether it’s for a special occasion or just because—and don’t hesitate to share your creations with family and friends! Happy baking!
Fruity Pebbles Cheesecake Tacos

Indulge in the whimsical delight of Fruity Pebbles Cheesecake Tacos, where crunchy, colorful cereal shells embrace a rich and creamy cheesecake filling. This fun dessert is perfect for any occasion, from birthday celebrations to family gatherings or simply as a sweet pick-me-up during a busy week. With their vibrant colors and playful presentation, these tacos are sure to enchant both kids and adults alike. Easy to prepare and fully customizable with your favorite toppings, they promise smiles around the table with every delicious bite!
- Prep Time: 20 minutes
- Cook Time: 30 minutes
- Total Time: 50 minutes
- Yield: Makes about 8 servings 1x
- Category: Dessert
- Method: No-Bake
- Cuisine: American
Ingredients
- 3 cups fruity cereal
- 1/2 cup unsalted butter, melted
- 8 oz cream cheese, softened
- 1/2 cup powdered sugar
- 1 tsp pure vanilla extract
- 1 cup whipped cream
- Additional fruity cereal for topping
Instructions
- Combine fruity cereal with melted butter in a bowl until evenly coated.
- Press the mixture firmly into taco molds or muffin tins and chill for at least 30 minutes.
- Beat cream cheese until fluffy; gradually add powdered sugar and vanilla extract until smooth.
- Gently fold in whipped cream until combined.
- Fill chilled taco shells with cheesecake filling generously.
- Top with additional fruity cereal before serving.
Nutrition
- Serving Size: 1 taco (75g)
- Calories: 236
- Sugar: 11g
- Sodium: 98mg
- Fat: 13g
- Saturated Fat: 8g
- Unsaturated Fat: 4g
- Trans Fat: 0g
- Carbohydrates: 27g
- Fiber: 1g
- Protein: 3g
- Cholesterol: 34mg