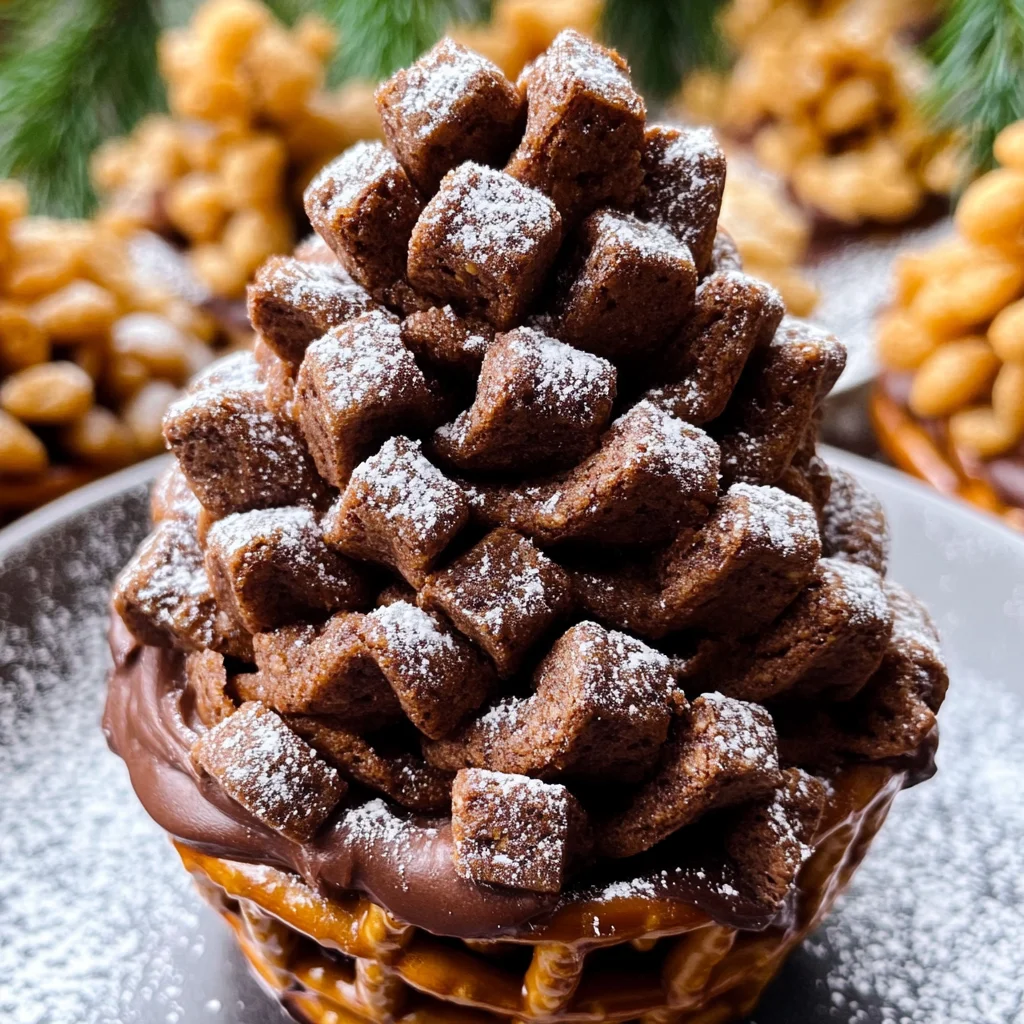
Edible Chocolate Pinecones
If you’re looking for a fun and festive treat to impress your family and friends this holiday season, you’ve come to the right place! These Edible Chocolate Pinecones are not just adorable; they’re full of delicious flavors that everyone will love. Imagine a dessert that looks like it came straight from a winter wonderland but is surprisingly easy to make. This recipe has become a favorite in my home, especially when we gather around during the holidays or even on cozy winter evenings.
What makes these little pinecone treats special is how simple they are to whip up. With just a few ingredients, you’ll have a delightful dessert that’s perfect for busy weeknights, family gatherings, or even as gifts for your loved ones. Plus, they’re a fantastic way to get kids involved in the kitchen. Let’s dive into why you will love making these sweet treats!
Why You’ll Love This Recipe
- Super Easy to Make: With just 20 minutes of prep time, you can create an impressive dessert without fussing over complicated steps.
- Family-Friendly Fun: Kids will adore helping shape the dough and decorating the pinecones with cereal pieces.
- Delicious Flavor: The combination of peanut butter and chocolate spread creates a rich and creamy filling that everyone will enjoy.
- Cute Presentation: These pinecone-shaped desserts are stunning on any holiday table and make great conversation starters.
- Make-Ahead Convenience: You can prepare these treats in advance and store them in an airtight container for up to three days!
Ingredients You’ll Need
This recipe uses simple, wholesome ingredients that are easy to find. You’ll love how they come together to create something so delightful!
- 3 cups Chocolate Cinnamon Toast Crunch
- 8 Honey Wheat Pretzel Twists
- 2/3 cup Peanut Butter
- 1/3 cup Nutella or Chocolate Spread
- 4 TBSP Salted Butter (Softened)
- 1 tsp Pure Vanilla Extract
- 1 1/4 Cup Powdered Sugar
Variations
The beauty of Edible Chocolate Pinecones is their flexibility! Feel free to get creative with these variation ideas:
- Try Different Nut Butters: Swap out peanut butter for almond or sunflower seed butter for a unique twist.
- Change the Chocolate Spread: Use white chocolate spread for a different flavor profile!
- Add Sprinkles or Nuts: For extra crunch or color, sprinkle chopped nuts or festive sprinkles on top before serving.
- Make Them Gluten-Free: Substitute gluten-free pretzels and cereal to enjoy this treat without worry.
How to Make Edible Chocolate Pinecones
Step 1: Prepare Your Workspace
Start by lining a baking tray with parchment paper. This step is crucial because it prevents sticking and makes cleanup easier later on.
Step 2: Make the Dough
In a medium bowl, combine the peanut butter, Nutella, butter, and vanilla. Mix until smooth. This tasty mixture forms the base of your pinecone, so ensure everything is well incorporated.
Step 3: Add Powdered Sugar
Slowly add in the powdered sugar, mixing it in gradually. This step helps achieve the perfect thick dough consistency needed for molding around your pretzels.
Step 4: Shape Your Pinecones
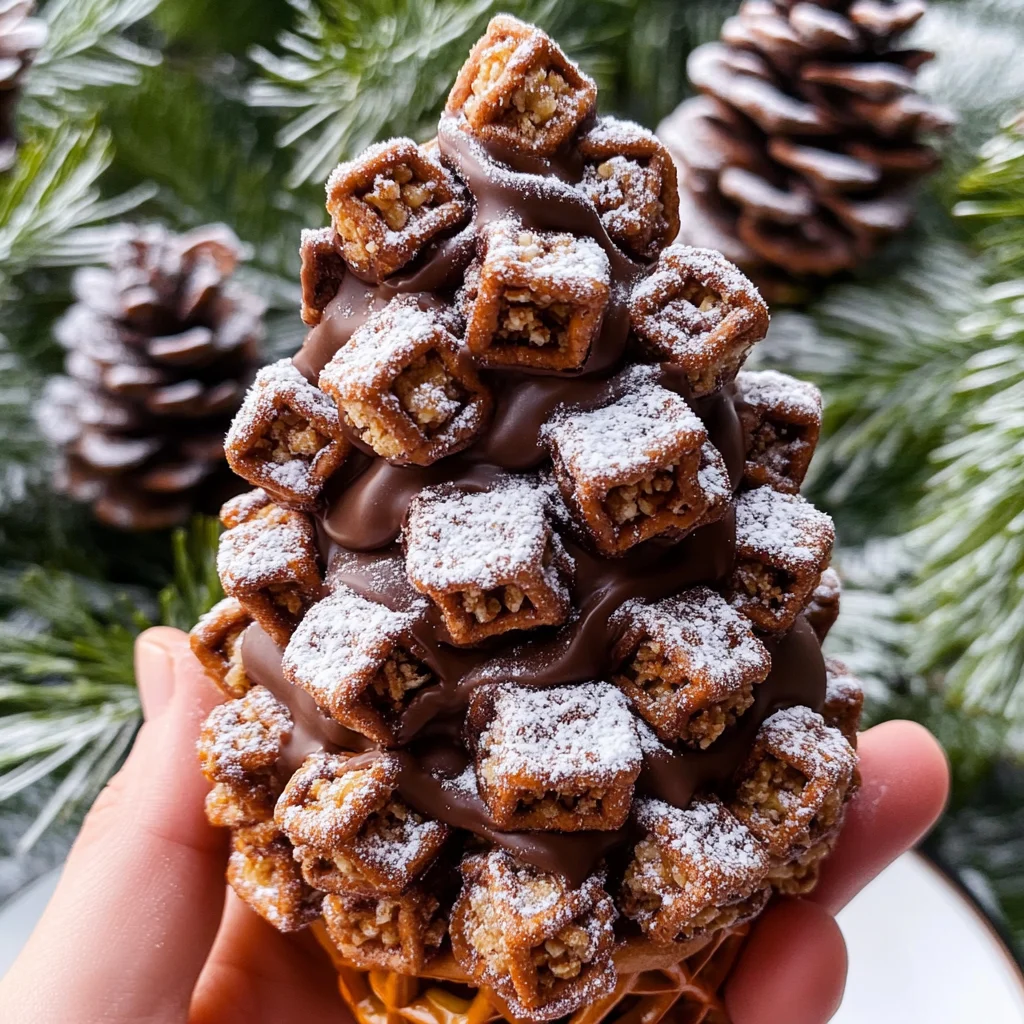
Divide your chocolate-peanut butter dough into eight equal parts. Mold one part completely around each pretzel rod, forming a cone shape with the pointy end at the top. It’s important that each pretzel is fully covered; this creates that whimsical pinecone look!
Step 5: Decorate with Cereal
Place your shaped pinecones on the parchment-lined tray. Starting from the bottom, press one square of Chocolate Cinnamon Toast Crunch into the dough at a slight angle pointing upwards. Continue spiraling up until you reach the top!
Step 6: Create Top Pieces
To finish off your pinecone, carefully slice another cereal square in half diagonally using a serrated knife. These pieces will complete your pinecone’s top middle section beautifully.
Step 7: Dust with Powdered Sugar
To give them that extra wintery touch, dust each completed pinecone with some additional powdered sugar. It mimics snow perfectly!
Step 8: Store or Serve
Finally, store your adorable Edible Chocolate Pinecones in an airtight container if you’re not serving them right away. Enjoy them within three days for optimal freshness!
There you have it! A delightful holiday treat that’s sure to bring smiles all around. Enjoy making these sweet creations with your loved ones!
Pro Tips for Making Edible Chocolate Pinecones
Creating these delightful treats is a breeze with a few handy tips to ensure they turn out perfectly!
-
Use room temperature ingredients – Starting with softened butter and other room temperature ingredients helps them blend more easily, resulting in a smoother dough that’s easier to mold.
-
Don’t rush the powdered sugar – Adding powdered sugar gradually ensures the mixture stays smooth. If you dump it all in at once, you may end up with lumps that are hard to incorporate.
-
Be gentle when shaping – When molding the dough around the pretzels, take your time to avoid breaking them. A careful touch will help maintain the integrity of your pinecones.
-
Customize your toppings – Feel free to mix in some mini chocolate chips or colorful sprinkles before forming your dough into cones. This adds a fun twist and makes them even more festive!
-
Store properly – Keeping these treats in an airtight container not only preserves freshness but also keeps them from losing shape or becoming too dry.
How to Serve Edible Chocolate Pinecones
These adorable Edible Chocolate Pinecones can be presented in so many creative ways that elevate their charm and make your dessert table irresistible!
Garnishes
-
Powdered Sugar Snow: A light dusting of powdered sugar on top not only enhances the snowy look but also adds a sweet touch that complements the chocolate flavor.
-
Fresh Mint Leaves: Adding a couple of fresh mint leaves beside each pinecone can provide a pop of color and a refreshing contrast to the rich flavors.
Side Dishes
-
Fruit Salad: A vibrant fruit salad made with seasonal fruits adds freshness and balances out the sweetness of the pinecones. Think berries, oranges, and pomegranate seeds for color!
-
Hot Cocoa: Pairing these treats with warm cups of hot cocoa creates a cozy experience perfect for holiday gatherings. You can even top it off with whipped cream (or dairy-free alternative) for extra indulgence.
-
Cheese Platter: A simple cheese platter with mild cheeses like brie or gouda provides a savory contrast that complements the sweet chocolate pinecones beautifully.
-
Spiced Nuts: Offering a bowl of spiced nuts as a side brings crunch and a hint of spice that balances out the sweetness, making for an enjoyable snacking experience alongside your desserts.
With these serving ideas, your Edible Chocolate Pinecones will not only taste amazing but will also be visually stunning additions to any holiday spread! Enjoy crafting these sweet delights!
Make Ahead and Storage
These Edible Chocolate Pinecones are perfect for meal prep and make delightful treats to have on hand during the holiday season! With their simple ingredients and easy assembly, you can whip them up in no time and store them for later enjoyment.
Storing Leftovers
- Store any remaining chocolate pinecones in an airtight container.
- Keep them at room temperature for up to 3 days.
- For optimal freshness, avoid placing them in direct sunlight or near heat sources.
Freezing
- If you want to keep them longer, freeze the chocolate pinecones.
- Wrap each pinecone tightly in plastic wrap or place them in a freezer-safe container.
- They can be frozen for up to 2 months. Just make sure they are completely cooled before freezing.
Reheating
- There’s no need to reheat these treats, as they’re best enjoyed at room temperature!
- If desired, you can let them sit out for about 10-15 minutes after removing from the fridge or freezer before serving.
FAQs
Have questions about making these delightful Edible Chocolate Pinecones? Here are some common inquiries!
Can I use a different type of nut butter instead of peanut butter?
Absolutely! You can substitute almond butter or sunflower seed butter if you prefer. Just ensure that the consistency is similar to peanut butter for the best results.
How do I store Edible Chocolate Pinecones?
To keep your Edible Chocolate Pinecones fresh, store them in an airtight container at room temperature for up to 3 days. If you want to keep them longer, consider freezing them!
Can I make Edible Chocolate Pinecones without Nutella?
Yes! If you’re looking for a nut-free option, substitute Nutella with a chocolate spread that doesn’t contain nuts. There are many great alternatives available that will work just as well!
How do I make these Edible Chocolate Pinecones look more festive?
You can add sprinkles or edible glitter after dusting with powdered sugar to give your chocolate pinecones an extra sparkle. They’ll be even more fun and festive!
Final Thoughts
I hope you find joy in creating these charming Edible Chocolate Pinecones! They not only make a delicious dessert but also bring a playful touch to your holiday celebrations. Enjoy making this recipe with family and friends—it’s sure to become a cherished tradition. Happy baking!
Edible Chocolate Pinecones

Create sweet memories with these delightful Edible Chocolate Pinecones! Easy-to-make treats perfect for your holiday celebrations—try them now!
- Prep Time: 20 minutes
- Cook Time: None
- Total Time: 0 hours
- Yield: Makes 8 servings 1x
- Category: Dessert
- Method: No-Bake
- Cuisine: American
Ingredients
- 3 cups Chocolate Cinnamon Toast Crunch
- 8 Honey Wheat Pretzel Twists
- 2/3 cup Peanut Butter
- 1/3 cup Nutella or Chocolate Spread
- 4 tablespoons Salted Butter (softened)
- 1 teaspoon Pure Vanilla Extract
- 1 1/4 cups Powdered Sugar
Instructions
- Prepare your workspace by lining a baking tray with parchment paper.
- In a medium bowl, mix together peanut butter, Nutella, butter, and vanilla until smooth.
- Gradually add powdered sugar, mixing until you achieve a thick dough.
- Divide the mixture into eight equal portions and mold each around a pretzel twist to form a cone shape.
- Press pieces of Chocolate Cinnamon Toast Crunch into the dough starting from the bottom until it's fully covered.
- Slice additional cereal squares diagonally and place them on top for decoration.
- Dust with powdered sugar for a snowy effect and store in an airtight container.
Nutrition
- Serving Size: 1 serving
- Calories: 160
- Sugar: 12g
- Sodium: 90mg
- Fat: 8g
- Saturated Fat: 3g
- Unsaturated Fat: 5g
- Trans Fat: 0g
- Carbohydrates: 20g
- Fiber: 1g
- Protein: 3g
- Cholesterol: 10mg