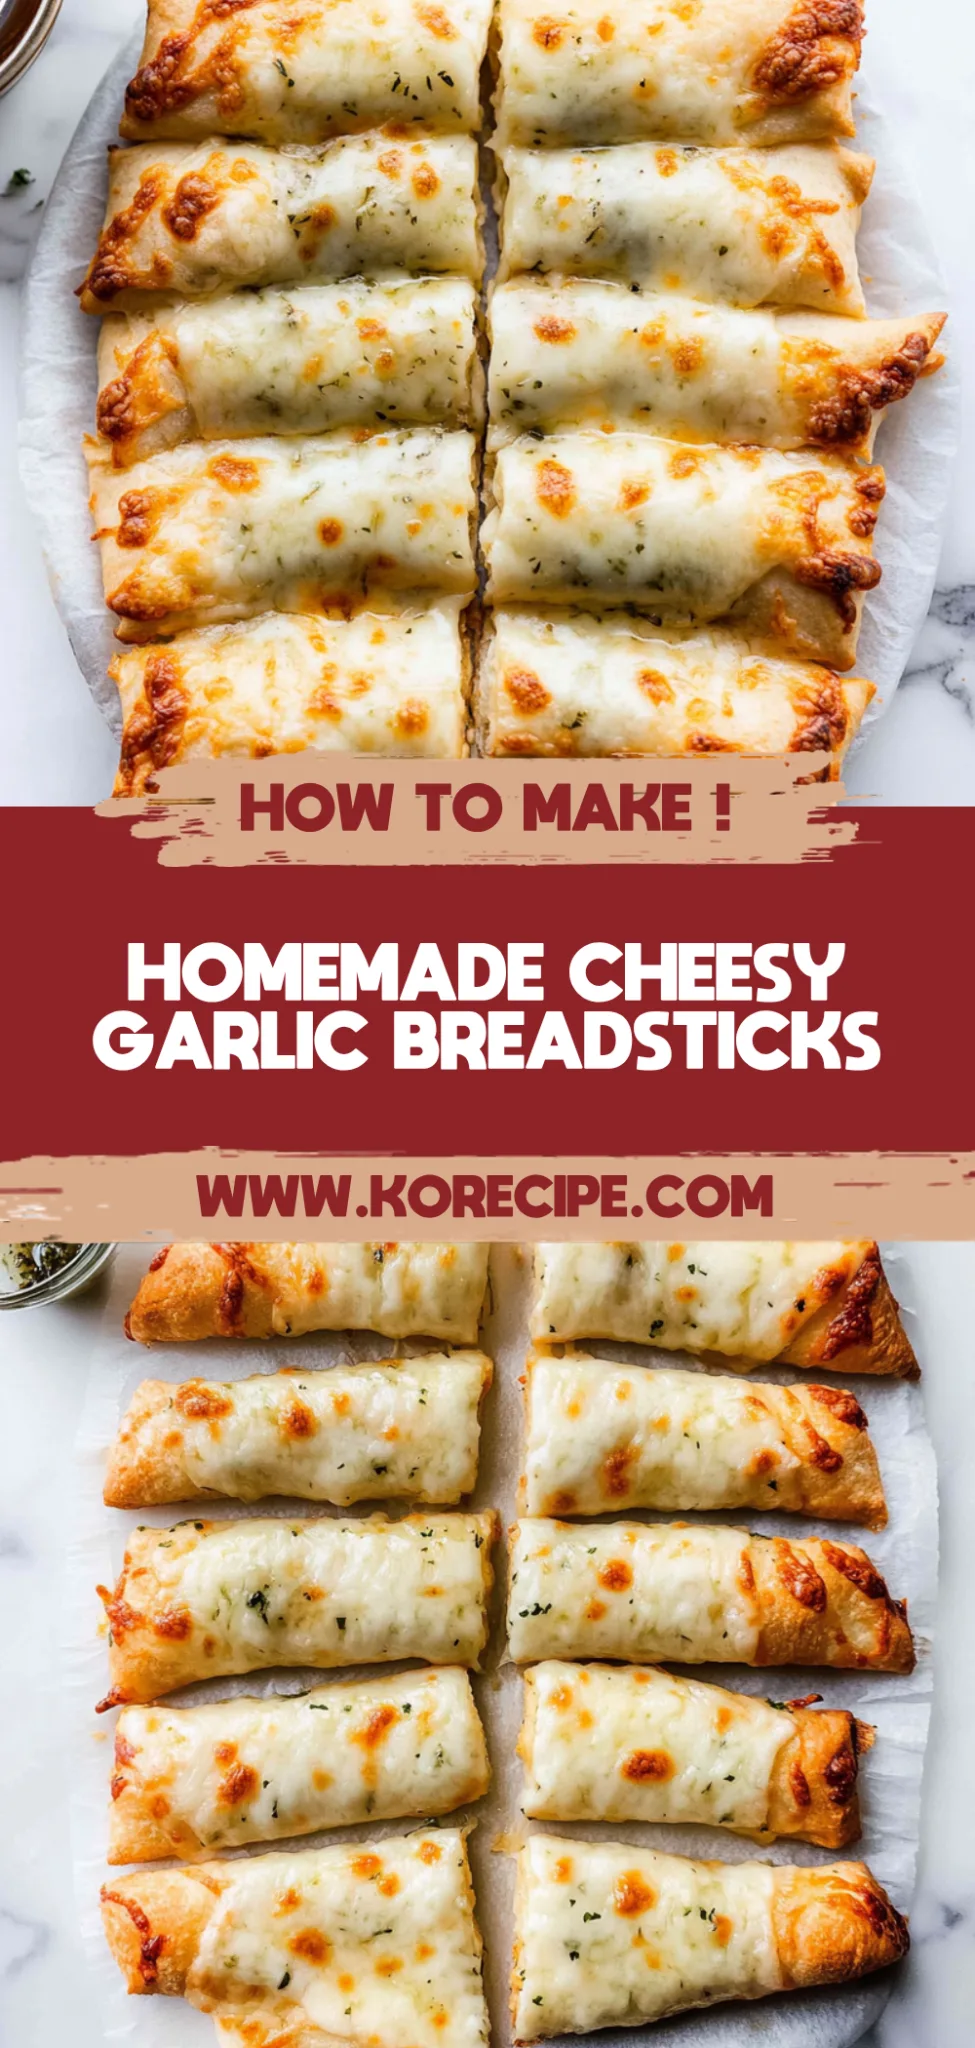
Homemade Cheesy Garlic Breadsticks: Comfort Food Magic
Cheesy, Garlicky Bliss Awaits
There’s something truly magical about the aroma of freshly baked breadsticks wafting through your kitchen. I remember the first time I made these Homemade Cheesy Garlic Breadsticks — it was a chilly evening, and I wanted something warm and comforting to share with my family. With just a handful of ingredients, they came out perfectly golden, ooey-gooey, and bursting with flavor.
What makes these breadsticks so special is how they transform any meal into a cozy celebration. As the garlic scent fills the air, you can almost see everyone’s faces light up in anticipation. Whether it’s a laid-back family dinner or a romantic date night, these delightful bites are sure to impress and bring everyone together around the table.
Pair them with a warm marinara sauce for dipping or serve alongside your favorite pasta dish for an unforgettable feast. You might even sprinkle some fresh herbs on top for an extra touch of flavor! Trust me, once you take that first cheesy bite, you’ll find yourself making these Homemade Cheesy Garlic Breadsticks again and again.
What are Homemade Cheesy Garlic Breadsticks?
Homemade Cheesy Garlic Breadsticks are a delightful fusion of Italian flavors that make for an irresistible appetizer or side dish. These breadsticks are crafted from a simple dough made with all-purpose flour, instant yeast, sugar, salt, warm water, and olive oil, creating a soft and chewy texture that is golden on the outside. Topped with melted butter, minced garlic, and an irresistible blend of mozzarella and parmesan cheeses, they deliver a rich and savory taste that will have your taste buds dancing. Baked in the oven until perfectly crispy yet tender, these breadsticks are easy to prepare and require minimal cleanup, making them a fantastic choice for any gathering or cozy night in.
Perfect For:
Weeknight Dinners: Whip up these Homemade Cheesy Garlic Breadsticks in just under 30 minutes, making them the ultimate go-to for a quick and satisfying meal after a busy day.
Budget-Friendly Treats: Enjoy the indulgent taste of cheesy, garlicky goodness without breaking the bank—these breadsticks are deliciously affordable and made with simple ingredients you likely already have at home.
Family Gatherings: These breadsticks are a hit with both kids and adults, easily scaling up to feed a hungry crowd during family dinners or game nights, leaving everyone satisfied and happy.
Cozy Nights In: Perfect for those chilly evenings when you crave comfort food, these Homemade Cheesy Garlic Breadsticks bring warmth and cheer to your home, making every bite feel like a cozy hug.
Homemade Cheesy Garlic Breadsticks Ingredients
For the Dough
- 2 cups all-purpose flour – This forms the base of your breadsticks, giving them a delightful texture.
- 1 packet instant yeast – Helps the dough rise quickly without needing to proof.
- 1 teaspoon sugar – A little sweetness to activate the yeast and enhance flavor.
- 1 teaspoon salt – Balances the flavors and enhances the overall taste of your breadsticks.
- 3/4 cup warm water (about 110°F) – Essential for activating the yeast; make sure it’s not too hot or too cold.
- 1 tablespoon olive oil – Adds richness and helps keep your breadsticks moist.
For the Topping
- 3 tablespoons butter (melted) – Creates a golden, flavorful coating that enhances every bite.
- 3 cloves garlic (minced) – Infuses a wonderful aroma and taste that’s irresistible in these Homemade Cheesy Garlic Breadsticks.
- 1 teaspoon dried parsley – Adds a hint of freshness and a pop of color to your topping.
- 1 cup mozzarella cheese (shredded) – Melts beautifully for that gooey, cheesy goodness we all love.
- 1/2 cup parmesan cheese (grated) – Provides a sharp, savory kick that complements the mozzarella perfectly.
Kitchen Equipment You’ll Need
- Mixing bowl
- Measuring cups and spoons
- Rolling pin
- Baking sheet
- Parchment paper
- Pizza cutter or sharp knife
- Small bowl
How to Make Homemade Cheesy Garlic Breadsticks
Step 1:
In a mixing bowl, combine 2 cups of all-purpose flour, 1 packet of instant yeast, 1 teaspoon of sugar, and 1 teaspoon of salt. Stir the dry ingredients together until they are well mixed. This is the foundation for your delicious breadsticks!
Step 2:
Next, add 3/4 cup of warm water (about 110°F) and 1 tablespoon of olive oil to the flour mixture. Mix everything together until a dough begins to form. It should be slightly sticky but manageable.
Step 3:
Now it’s time to knead! Transfer the dough onto a floured surface and knead it for about 5 minutes until it’s smooth and elastic. You want to develop that gluten for a perfect texture, so don’t rush this step—it’s essential for the best breadsticks.
Step 4:
Once your dough is smooth, place it in a greased bowl and cover it with a clean kitchen towel. Let it rise in a warm place for about 1 hour or until it has doubled in size. You’ll know it’s ready when it looks puffy and has risen significantly.
Step 5:
Preheat your oven to 400°F (200°C). This ensures that when your breadsticks are ready, they’ll bake evenly and come out perfectly golden brown.
Step 6:
After the dough has risen, punch it down gently to release any air bubbles. Roll it out into a rectangle on a floured surface, making sure it’s about half an inch thick. This will give you those nice fluffy breadsticks when baked!
Step 7:
Transfer your rolled-out dough onto a baking sheet lined with parchment paper. This makes cleanup easy and prevents sticking, so your delicious sticks will come off effortlessly later.
Step 8:
In a small bowl, mix together 3 tablespoons of melted butter, 3 cloves of minced garlic, and 1 teaspoon of dried parsley. Brush this flavorful mixture generously over the dough, covering every corner for maximum taste!
Step 9:
Now sprinkle both 1 cup of shredded mozzarella cheese and 1/2 cup of grated parmesan cheese evenly over the top. The more cheese, the better—this is what makes your breadsticks irresistibly cheesy!
Step 10:
Using a pizza cutter or knife, cut the dough into strips. Feel free to make them as thick or thin as you prefer; just remember that thinner strips will bake faster!
Step 11:
Bake your cheesy garlic breadsticks in the preheated oven for about 15 minutes or until they turn golden brown. Keep an eye on them during the last few minutes; you want them perfectly toasted but not overdone.
Step 12:
Once baked, remove them from the oven and let cool slightly before serving. They’ll be hot and cheesy—perfect for dipping or enjoying on their own!
Tips for Making This Perfect
- Use warm water for activating yeast: Water around 110°F is ideal for activating the yeast without killing it, ensuring your dough rises properly and achieves that fluffy texture.
- Knead until smooth: Kneading the dough for about 5 minutes develops gluten, which gives your breadsticks the perfect chewiness. Avoid under-kneading to prevent dense and flat sticks.
- Let the dough rise in a warm place: For optimal rising, place your covered bowl in a warm area, like an oven turned off or near a sunny window. This encourages yeast activity, leading to a light and airy texture.
- Don’t skip the punch down: Punching down the risen dough releases excess gas and allows it to redistribute evenly. This step is crucial for achieving uniform breadsticks that bake evenly.
- Cut strips with sharp tools: Using a pizza cutter or sharp knife helps create clean cuts in the dough. This prevents tearing and ensures that the cheese stays intact on each stick during baking.
- Check for doneness carefully: Keep an eye on your breadsticks as they bake; they should be golden brown. Overbaking can lead to dryness, while underbaking might leave them doughy inside.
- Serve warm for best flavor: These cheesy garlic breadsticks are best enjoyed fresh out of the oven. The warmth enhances the aroma of garlic and cheese, making each bite irresistible!
Optional Ingredients
- Gorgonzola cheese: For a bold twist, sprinkle crumbled Gorgonzola on top before baking. It adds a rich, tangy flavor that beautifully complements the garlic and butter.
- Red pepper flakes: If you enjoy a bit of heat, add a pinch of red pepper flakes to the melted butter before brushing it onto the breadsticks. This will infuse them with a spicy kick that enhances the overall taste.
- Sautéed spinach: Fold in some sautéed spinach into the dough for added texture and a pop of color. It not only brings earthiness but also balances the richness of the cheeses.
- Lemon zest: Brighten up your breadsticks by adding freshly grated lemon zest to the melted butter. This will give your dish a refreshing citrus note that contrasts delightfully with the savory flavors.
- Balsamic glaze: Drizzle balsamic glaze over the finished breadsticks for an elegant touch. This sweet and tangy sauce adds depth and visual appeal, elevating your appetizer to gourmet status.
What to Pair with Homemade Cheesy Garlic Breadsticks?
A fresh salad makes an excellent pairing with your cheesy garlic breadsticks, providing a crisp contrast that enhances the overall dining experience. Consider a classic Caesar salad with its creamy dressing and crunchy croutons, which complements the richness of the melted cheese while balancing out the garlicky flavors. Alternatively, a light arugula salad topped with cherry tomatoes and a zesty lemon vinaigrette can offer refreshing notes that cut through the indulgence of the breadsticks.
For a heartier option, steamed or roasted vegetables can beautifully round out your meal. Think of vibrant asparagus or roasted bell peppers seasoned lightly with olive oil and salt; their natural sweetness and slight char will create a delightful textural contrast to the soft, cheesy breadsticks. The earthiness of these vegetables not only adds color to your plate but also enhances the savory garlic notes in each bite.
When it comes to comfort sides, creamy mashed potatoes or buttery corn on the cob can elevate your homemade breadsticks to new levels of satisfaction. The richness of buttery mashed potatoes pairs wonderfully with the cheesy goodness of your breadsticks, creating a warm and filling meal. Similarly, sweet corn offers a delightful pop of sweetness that plays off the savory flavors, making each bite more enjoyable.
Lastly, don’t forget about drink pairings! A glass of chilled Sauvignon Blanc complements the dish beautifully, as its crisp acidity helps balance the richness from both the cheese and butter. For those with a sweet tooth, serving a light dessert like lemon sorbet can cleanse your palate after indulging in cheesy goodness while providing a refreshing finish to your meal.
Variations and Substitutions
Whole Wheat Flour: Replace all-purpose flour with whole wheat flour for a nuttier flavor and added fiber. The texture will be denser, which can create a heartier breadstick that pairs beautifully with rich dips or soups.
Cauliflower Crust: For a low-carb alternative, use a cauliflower crust instead of traditional dough. Simply pulse steamed cauliflower into rice-like grains, mix with cheese and egg to bind, and bake until golden. This results in a lighter, gluten-free version that’s still cheesy and flavorful.
Herbed Butter: Swap out the regular butter for an herbed compound butter made with fresh herbs like basil, oregano, or thyme. This addition elevates the flavor profile, giving your breadsticks a fragrant, aromatic twist that complements the garlic perfectly.
Spicy Kick: Add crushed red pepper flakes to the garlic butter mixture for those who enjoy a bit of heat. This small adjustment can transform your cheesy garlic breadsticks into a zesty treat that tantalizes the taste buds.
Cream Cheese Filling: Incorporate a cream cheese filling by spreading softened cream cheese onto the rolled-out dough before adding the toppings. This creates an indulgently creamy center that contrasts beautifully with the crispy exterior.
Vegan Cheese: Opt for plant-based cheeses in place of mozzarella and parmesan for a dairy-free version. Many brands offer delicious alternatives that melt well and provide that much-loved cheesy flavor without any animal products.
Refrigerate your Homemade Cheesy Garlic Breadsticks by allowing them to cool completely before transferring them to an airtight container. They will stay fresh in the fridge for up to 3 days. To reheat, simply pop them in the oven at 350°F for about 10 minutes, which will help restore their crispiness and gooey cheese texture.
These breadsticks can be frozen, but keep in mind that the texture may change slightly upon thawing. Wrap each breadstick individually in plastic wrap and place them in a freezer-safe bag or container for easy portioning. They can be stored in the freezer for up to 2 months. To enjoy, thaw them overnight in the refrigerator and reheat in the oven at 350°F for about 15 minutes or until warmed through.
FAQ
Can I use whole wheat flour instead of all-purpose flour for this recipe?
Yes, you can substitute whole wheat flour for all-purpose flour, but keep in mind that it may result in denser breadsticks. You might also need to adjust the water slightly to achieve the right dough consistency.
What happens if I don’t have instant yeast?
If you don’t have instant yeast, you can use active dry yeast instead. Just be sure to activate it first by dissolving it in warm water with the sugar and letting it sit for about 5-10 minutes until frothy before adding it to your dough ingredients.
How can I ensure my dough rises properly?
To ensure proper rising, make sure your warm water is around 110°F, as too hot or too cold can affect the yeast’s activity. Additionally, place your dough in a warm, draft-free area while it rises for the best results.
Can I make the dough ahead of time and store it?
Absolutely! You can prepare the dough in advance and refrigerate it after kneading. Just let it come to room temperature before rolling it out and baking when you’re ready to enjoy your cheesy garlic breadsticks.
Is there a way to make these breadsticks vegan?
Yes! You can substitute the butter with vegan margarine and use dairy-free cheese alternatives for the mozzarella and parmesan. This way, you can still enjoy deliciously cheesy garlic breadsticks without any animal products.
Can I add other toppings or change the cheese types?
Definitely! Feel free to experiment with different cheeses like cheddar or gouda, or add toppings such as chopped herbs or spices for extra flavor. Just remember that changing the cheese might alter the melting characteristics.
How do I know when my breadsticks are done baking?
Your breadsticks are done when they turn a golden brown color on top and sound hollow when tapped on the bottom. If you’re unsure, you can always use a toothpick; if it comes out clean from the center, they’re ready!