Grilled Cheese Burrito: Cheesy Goodness Awaits!
Cheesy, Warm, and Irresistibly Good
I first whipped up this Grilled Cheese Burrito on a chilly evening when I craved something comforting yet exciting. The moment I took that first bite, the crispy exterior gave way to a melty, cheesy center that warmed me right down to my toes. It was so easy to put together, and the flavors danced on my palate like a cozy hug.
What makes this dish truly special is the heavenly aroma that fills your kitchen as it grills to perfection. The delighted reactions from family and friends are priceless—everyone gathers around, eager for a taste of this delightful fusion. Whether it’s a cozy dinner at home or a casual date night, this burrito is sure to impress without any fuss.
To make it even more delicious, serve your Grilled Cheese Burrito with a side of tangy salsa or creamy guacamole for dipping. Top it off with fresh cilantro or a sprinkle of chili flakes for an extra kick, and you’ll have a meal that feels like a warm embrace. Trust me; once you try it, you’ll be counting down the days until you can make it again!
What are Grilled Cheese Burrito?
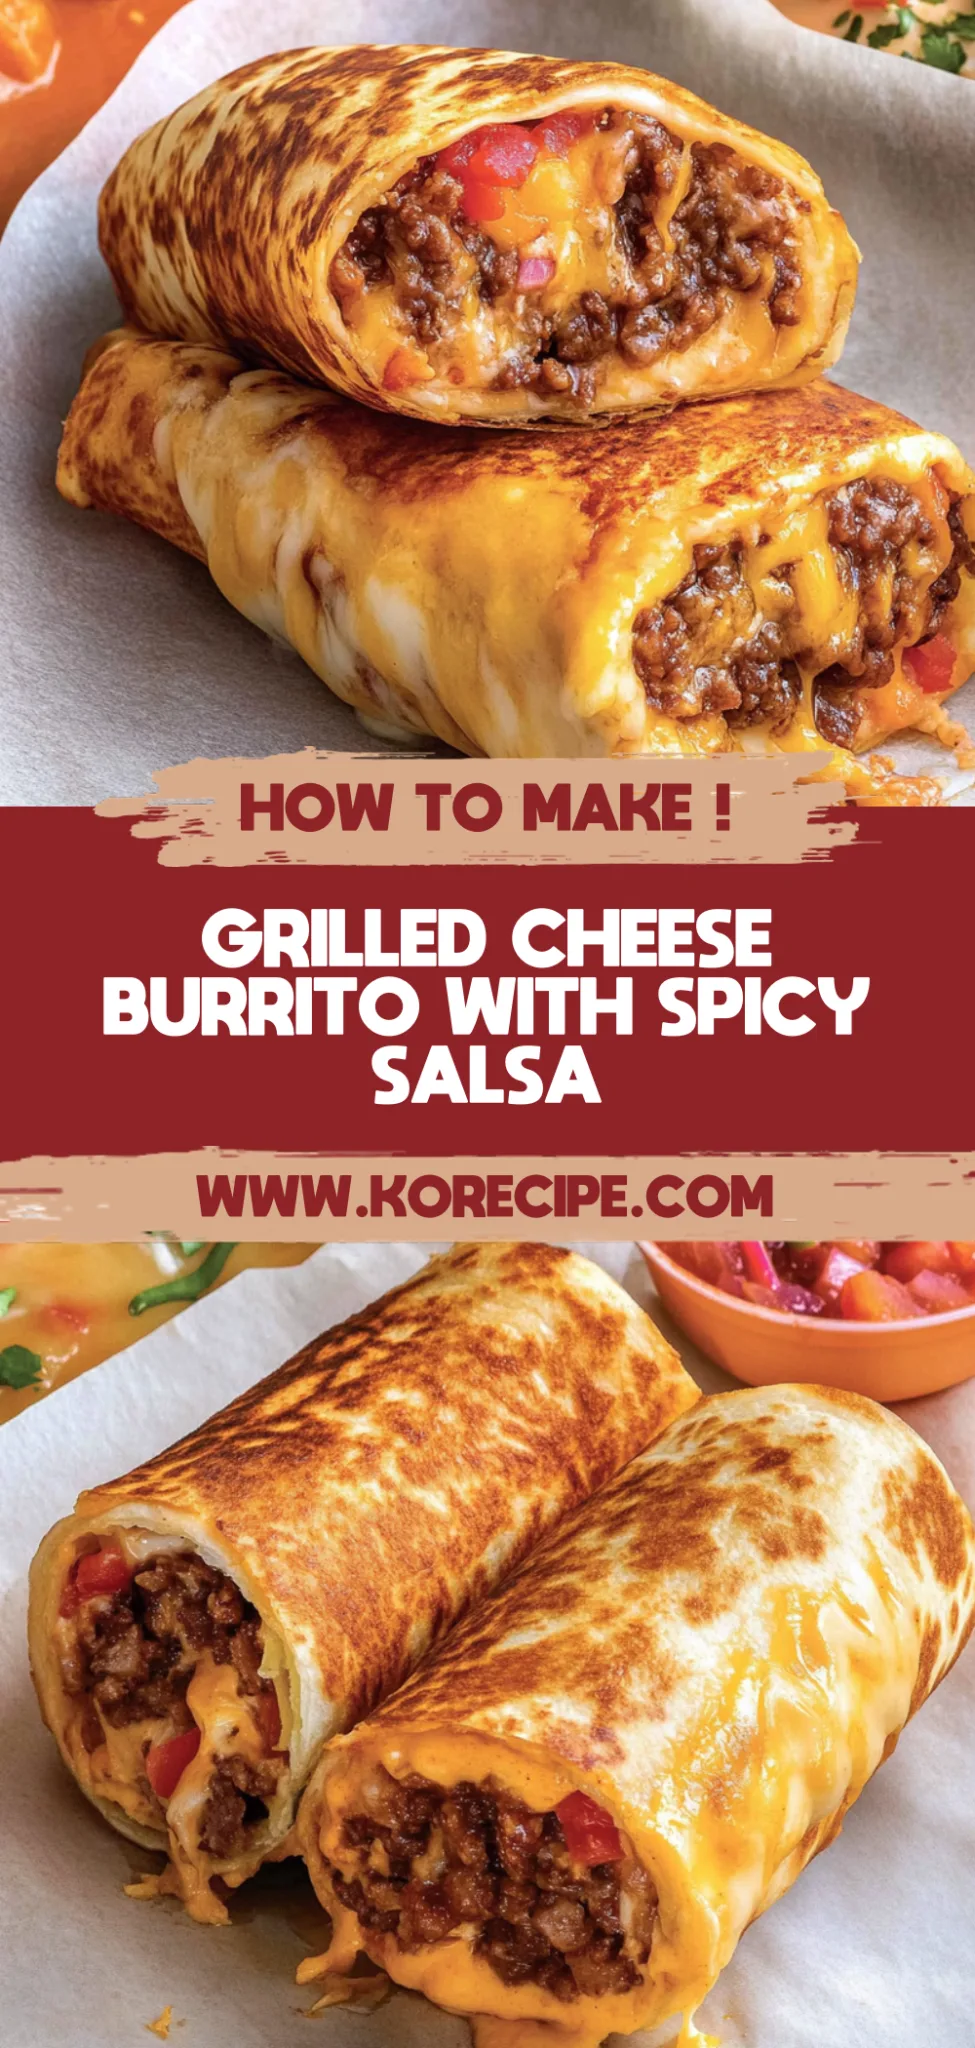
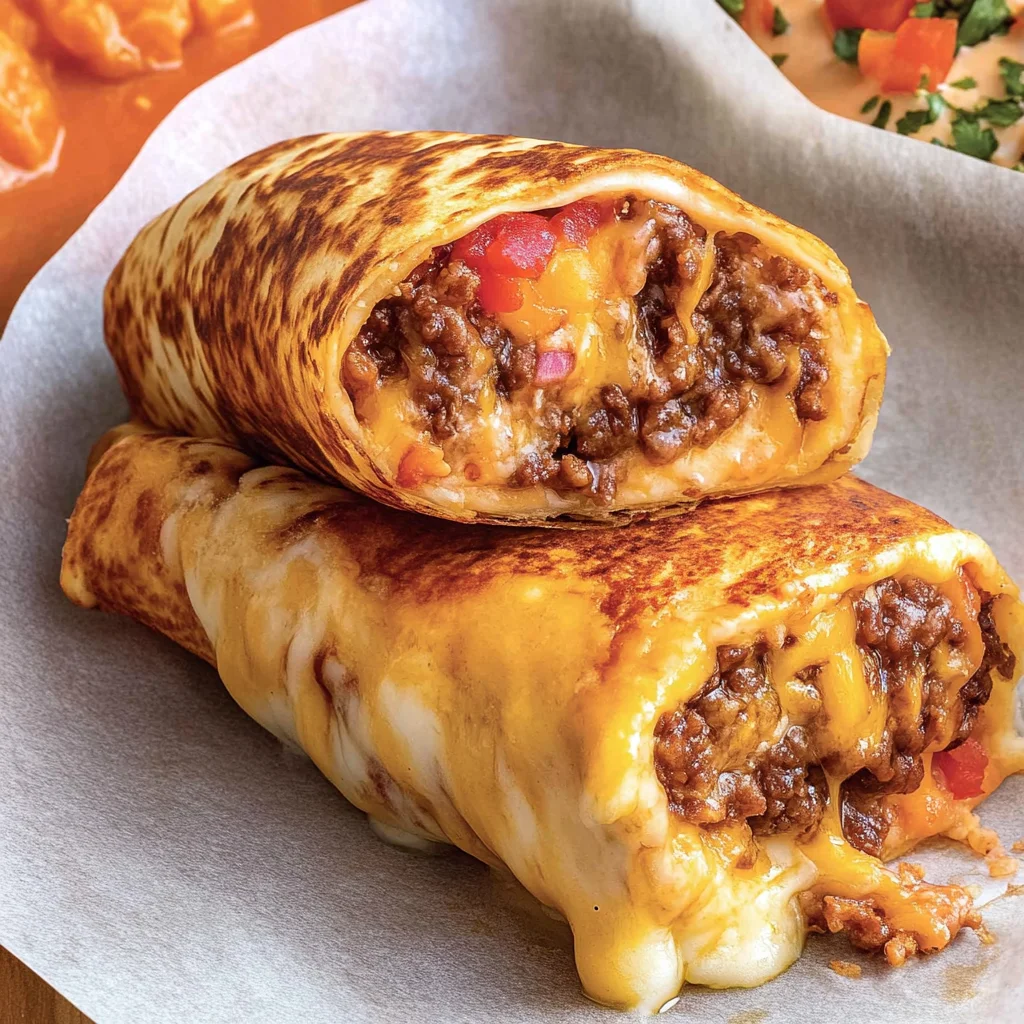
A Grilled Cheese Burrito is a delightful fusion dish that combines the comforting elements of a classic grilled cheese sandwich and the heartiness of a burrito. This mouthwatering creation features a warm, crispy tortilla filled with gooey melted cheese, savory refried beans, and optional cooked rice, all enhanced by zesty salsa. When cooked in a skillet with butter, the outside becomes perfectly golden and crispy while the inside remains tender and cheesy, creating a satisfying bite. Not only is it delicious, but it’s also easy to prepare and requires minimal cleanup, making it an ideal choice for a quick meal or snack.
Perfect For:
Quick Weeknight Dinners: Whip up this Grilled Cheese Burrito in just 30 minutes, making it the perfect solution for busy evenings when you crave something comforting yet satisfying.
Budget-Friendly Feasts: With simple ingredients that pack a punch of flavor, this recipe offers a delicious way to enjoy a filling meal without breaking the bank.
Family Gatherings: This dish is easily scalable, allowing you to prepare multiple burritos at once, ensuring there’s plenty to go around for everyone at the table.
Cozy Comfort Food: Ideal for those rainy days or chilly nights, the gooey cheese and savory fillings provide a warm embrace that feels like a hug in every bite.
What Goes Into Grilled Cheese Burrito
For the Filling
- 2 cups shredded cheese (cheddar or a blend) – Use your favorite cheese for that gooey goodness inside the burrito.
- 1 cup refried beans (canned or homemade) – Adds creaminess and a hearty element to each bite.
- 1 cup cooked rice (optional) – This can help stretch the filling and make it even more satisfying.
- 1 cup salsa (for added flavor) – Choose a salsa you love for an extra kick of flavor in every mouthful.
- 1 cup sour cream (for serving) – A dollop on top brings coolness that balances the warmth of the burrito.
For the Wrap
- 4 large flour tortillas (10-inch size) – Soft tortillas that can hold all those delicious fillings without breaking.
- 4 tablespoons butter (for grilling) – Grilling in butter ensures a golden, crispy exterior that’s irresistible.
Kitchen Equipment You’ll Need
- Mixing bowl
- Spoon or spatula
- Large flour tortillas
- Griddle
- Butter
- Knife
- Cutting board
How to Make Grilled Cheese Burrito
Step 1:
In a bowl, start by mixing together the 2 cups of shredded cheese, 1 cup of refried beans, 1 cup of cooked rice (if you’re using it), and 1 cup of salsa. Make sure to combine everything well so that the flavors meld together nicely. This cheesy filling will be the star of your burrito!
Step 2:
Once your filling is well mixed, set it aside. This will allow the flavors to settle while you prepare the tortillas and get ready for assembling your burritos.
Step 3:
Take one of your large flour tortillas and lay it flat on a clean surface. Make sure it’s spread out completely, giving you enough room to work with as you fill it.
Step 4:
Spoon a generous amount of the filling mixture onto the center of the tortilla. Aim for about a quarter of the mixture per burrito, ensuring you have enough room to fold and roll without spilling over.
Step 5:
Now it’s time to fold! Start by folding the sides of the tortilla over the filling, tucking them in gently. Then, roll it up tightly from the bottom to form a burrito shape. Make sure it’s snug but not too tight, so all that delicious filling stays inside.
Step 6:
Heat your griddle over medium heat and add 1 tablespoon of butter. Let it melt and sizzle slightly—this is when your grilling begins! The butter will help create that lovely golden brown crust on your burrito.
Step 7:
Place your burrito seam-side down on the griddle, letting it grill for about 3-4 minutes. Keep an eye on it; you want that side to turn a beautiful golden brown before flipping.
Step 8:
Gently flip your burrito over, and add another tablespoon of butter to the griddle. Grill this side for another 3-4 minutes until it’s equally golden brown and crispy. You’ll love that satisfying crunch!
Step 9:
Once both sides are perfectly grilled, remove the burrito from the griddle and let it cool slightly on a cutting board before slicing in half. This brief cooling period will make handling much easier!
Step 10:
Serve your grilled cheese burritos warm with a side of sour cream for dipping. Enjoy every gooey bite with friends or family—it’s comfort food at its best!
Tips
- Choose the right cheese: Opt for a blend of cheeses like cheddar and Monterey Jack for maximum gooeyness — the creamy melt will elevate the burrito’s texture and flavor.
- Warm tortillas before assembly: Gently heating your tortillas in a skillet or microwave makes them pliable and less likely to tear when rolling — this ensures a perfectly wrapped burrito.
- Use room temperature ingredients: Allow the refried beans and cheese to come to room temperature before mixing — this helps them combine more easily, leading to a uniform filling with better melting.
- Don’t overfill the burrito: Stick to a generous but manageable amount of filling — overstuffing can make it difficult to roll tightly, resulting in a messy burrito that may burst while grilling.
- Monitor grilling time closely: Keep an eye on the burritos as they grill, flipping them at the first sign of golden brown — this prevents burning and ensures even crispness on both sides.
- Let them rest before slicing: Allow the grilled burritos to cool for a minute or two after grilling — this helps the melted cheese set slightly, making each slice cleaner and more enjoyable.
Optional Ingredients
- Pepper Jack cheese: For an extra kick, substitute some of the shredded cheese with Pepper Jack; it adds a creamy texture and just the right amount of spice to elevate your burrito.
- Sliced jalapeños: These zesty slices bring heat and crunch to your Grilled Cheese Burrito; layer them inside before grilling for a fiery surprise.
- Fresh cilantro: Adding a handful of chopped cilantro introduces a vibrant freshness that brightens up the flavors; sprinkle it inside or on top before serving.
- Avocado slices: Creamy avocado not only enhances the richness but also provides a delightful contrast to the cheesy goodness; add slices directly into your burrito for a satisfying bite.
- Chipotle sauce: Drizzle this smoky and spicy sauce over the finished burrito for an added depth of flavor that complements the cheesy filling perfectly.
What to Pair with Grilled Cheese Burrito?
To complement the gooey richness of the Grilled Cheese Burrito, a fresh salad makes an excellent pairing. Consider a zesty corn and avocado salad tossed with lime juice and cilantro. The vibrant flavors and crunchy textures of the salad not only provide a refreshing contrast to the creamy burrito but also add a burst of freshness that brightens up each bite.
Roasted vegetables are another perfect accompaniment to this hearty dish. Try serving some caramelized bell peppers and zucchini drizzled with balsamic glaze. The natural sweetness of the roasted veggies balances the savory cheese and beans, while their charred edges introduce a delightful texture that enhances the overall experience.
For those seeking comfort, why not serve up some fluffy Mexican-style rice? Its subtle flavors can soak up any lingering salsa or sour cream, creating a complete meal that’s satisfying without overwhelming the palate. The rice adds substance and rounds out the burrito with its soft, warm texture, making every bite feel indulgent yet comforting.
Finally, consider a light drink like a refreshing limeade or even a crisp lager for those who enjoy beer. These beverages cut through the richness of the cheese while echoing the bright notes from any accompanying salsas or salads. For dessert, a simple tres leches cake would be an ideal sweet finish, providing a moist and milky contrast that perfectly complements the savory elements of the meal.
Variations and Substitutions
Pepper Jack Cheese: Swap out cheddar for pepper jack cheese to add a spicy kick to your grilled cheese burrito. The creamy texture combined with the heat of the jalapeños will elevate your burrito experience, making it perfect for those who enjoy a little extra warmth in their meals.
Black Beans instead of Refried Beans: Use black beans in place of refried beans for a heartier, more textured filling. Simply mash them slightly before adding to your mixture for a delightful change that packs in protein and fiber while adding a slightly sweet, earthy flavor.
Quinoa for Rice: Substitute cooked rice with quinoa for a protein-packed twist that’s also gluten-free. This swap not only adds a nutty flavor but also gives your burrito an interesting chewiness that complements the other ingredients beautifully.
Guacamole in place of Sour Cream: Instead of serving with sour cream, try offering guacamole on the side. The creamy avocado dip brings a fresh, zesty element that pairs wonderfully with the rich flavors of the burrito and adds a burst of color to your plate.
Smoky BBQ Sauce: Incorporate smoky BBQ sauce into your filling mixture instead of salsa for a mouthwatering barbecue twist. This variation infuses the burrito with savory sweetness and depth, transforming it into a comfort food sensation that’s hard to resist.
Spinach or Kale Addition: Add fresh spinach or kale to your filling for an extra boost of greens. This simple addition not only enhances the nutritional value but also introduces a hint of earthiness and vibrant green color, making your dish look as good as it tastes.
Mediterranean Twist with Feta and Olives: For an adventurous flavor profile, replace shredded cheese with crumbled feta cheese and toss in some chopped kalamata olives. This Mediterranean-inspired variation offers tangy notes and briny richness that will transport your taste buds to the sunny shores of Greece.
How to Store
To store your Grilled Cheese Burrito in the refrigerator, allow it to cool completely before wrapping each burrito individually in plastic wrap or aluminum foil. Place them in an airtight container to prevent moisture loss. These burritos will keep well in the fridge for up to 3 days. When ready to enjoy, reheat them in a skillet over medium heat for about 5-7 minutes, flipping halfway through to restore that crispy texture, or use the microwave for quicker reheating, though this may soften the tortilla.
This dish does freeze well, although the texture of the tortillas may change slightly upon thawing. To freeze, wrap each burrito tightly in plastic wrap and then place them in a freezer-safe bag or container. They can be kept frozen for up to 2 months. To thaw, simply transfer them to the refrigerator overnight before reheating in a skillet or microwave until heated through.
Frequently Asked Questions
Can I use a different type of cheese for this recipe?
Absolutely! While cheddar is a popular choice, you can experiment with other cheeses like Monterey Jack, mozzarella, or even pepper jack for a spicy kick. Just ensure that the cheese melts well to achieve that gooey texture.
Is it necessary to include rice in the filling?
No, adding rice is optional! If you prefer a more cheese-centric burrito, feel free to omit the rice. Alternatively, you can use quinoa or cauliflower rice for a lighter option.
How do I keep my burritos from getting soggy?
To prevent sogginess, make sure your filling ingredients are not too wet. Drain excess liquid from the salsa and refried beans before mixing. Additionally, grilling them until golden brown will create a nice crispy exterior.
Can I prepare the filling ahead of time?
Yes, you can prepare the filling in advance! Mix your shredded cheese, refried beans, cooked rice, and salsa together and store it in an airtight container in the fridge for up to 2 days. Just assemble and grill when you’re ready to eat.
Are these burritos suitable for freezing?
Definitely! Once grilled and cooled, wrap each burrito tightly in foil or plastic wrap and place them in a freezer bag. They can be frozen for up to 3 months; just reheat them directly from frozen on a skillet or in the oven.
Can I make this recipe gluten-free?
Yes, simply swap out the flour tortillas for gluten-free tortillas available at most grocery stores. Make sure to check that all other ingredients are also gluten-free if necessary.
What cooking equipment do I need?
You will need a griddle or large skillet for grilling the burritos. A spatula will help with flipping them easily as they cook. If you don’t have either, you can also use an oven-safe pan on medium heat on your stovetop.
Grilled Cheese Burrito
Ingredients
Method
- In a bowl, mix the shredded cheese, refried beans, cooked rice, and salsa until well combined.
- Set the filling mixture aside.
- Lay a tortilla flat on a clean surface.
- Spoon a generous amount of the filling mixture onto the center of the tortilla.
- Fold the sides of the tortilla over the filling, then roll it up tightly from the bottom to form a burrito.
- Heat a griddle over medium heat and add 1 tablespoon of butter.
- Place the burrito seam-side down on the griddle and grill for about 3-4 minutes until golden brown.
- Flip the burrito, add another tablespoon of butter, and grill the other side for another 3-4 minutes.
- Remove from the griddle and let cool slightly before slicing in half.
- Serve warm with sour cream on the side for dipping.